Feb 28, 2011

DIY : Beaded Dragon Fly

      This weekend I had a visit from a friend and after long hours of chatting , sharing updates we were looking for some easy to make crafts to keep ourselves occupied. We came upon some tutorials for beaded dragonfly patterns while we were looking for easy jewelery making instructions and though we have followed the same steps as given in the original tutorial here,   I want to give the step-by-step instructions  as we have made slight modifications to the original tutorial by adding beads to the fly's wings too to add some more bling .  


You might not get the correct shape the first time itself, but once you try it out again, its just so easy to make and you can finish it in '15 minutes'. I got it right the second time and see how cute my little dragonfly looks in my fruit bowl and curtain.


You can also try two different color combination of beads - This gold and transparent bead combination was tried out by my friend and it has turned out lovely... !!!

Materials Needed

Wire               - 12 inch long. (The wire must be easy enough to bend with your fingers)
Seed Beads    - 1 small packet (Approx 100 for a medium sized dragonfly)
Larger Beads  - 9 No (For the body)

Steps for the tutorial are seen underneath each corresponding picture.
 
The dragonfly looks better when contrast 
color combination is used for the wings and the body.
Fold the wire in half. Twist the end to form a loop as
shown in the figure so that the beads don't fall off.
Slide the larger beads (approx 7) over both the wires.
Slide the smaller seed beads over one half of the  wire
as shown above.
Form a small loop  (This makes the wing)
 using the  beaded half as shown above.
 Tuck the looped wing portion behind the straight wire (body)
so that the beads donot fall off.
Now, Slide beads in the other half of the wire as shown above.
Form a loop on the other half of the same size as done earlier.
Now bring the left-over wire upwards and slide the beads in 
the right half as shown. Slide more beads (almost double)
since this will be used for the larger wings.
Make a loop on the right hand side slightly bigger
than the first two loops.
Slide beads in the left hand wire and form another bigger 
loop above the smaller one as shown in the figure.
Twist the wires at the back to secure the beads and
bring both the wires up from behind. 
Slide two bigger beads over both the wires to form the head portion.
Trim the excess wire and slide one smaller bead on each wire.
Curl the trimmed end and twist the wire inwards to form the antennae. 

I am linking this to the following blog parties :  DIY carnival at the Key Bunch, the  Weekend Wrap Up party at Colors Dekor, CraftOManiac Monday, Mad skills party, Craft Link Party  and the blog party here .

Feb 25, 2011

An award and a Tag

This is the first time I have been tagged, and I must admit that each time I see other blogger friends being tagged, I used to think , that it is better if I am not, just because I have to reveal 'seven' things about me... But I thoroughly enjoyed the process... It was fun....!!! Thanks a lot Kamakshi , for this lovely award.


  1. I love reading long mails and regular updates…from friends rather than receiving phone calls... .It just brings a  smile on my face when I see one in my mail-box.
  2. Though I read all genre books,I like reading romantic novels and  love happy endings. Ahh..  I can imagine some of my friends giving me that Have-your-tastes-not-changed-yet and Have-you-not-grown-up-yet look ;-) ;-) …
  3. I love to shop in home decor and book stores anytime , but I do not prefer shopping in clothing stores always - that depends on the mood..!
  4. I can’t imagine myself living in a place where there’s no greenery  around.. The love for plants comes from my parents, uncles, aunts and grandparents… Guess it’s manufacturing defect. ;-) ;-) ….
  5. I love to travel … I visit different places atleast once in a year.. so far so good…. I prefer travelling , when I need a break from everything...
  6. I get bored easily.. There has to be something or the other to keep me occupied… Neither can I sit idle for a long time indoors....
  7. I admire food being  served in beautiful cutlery in a good ambiance. .And of course, I love candlelit and pool-side dinners .
Ooops.. .Thats it !!! Done… .!!!  

I would like to tag the following lovely bloggers for this award.
  1. Karishma of Effortless Cooking,Easy Baking
  2. Kamini of Saffron and Silk 
  3. Sanghamitra of Rainbow ,the colours of India.
  4. Vineeta of ArtnLight
  5. Purnima - A Creative Project
  6. Deepi at Deepi's World.
  7. Debbie at Confessions of a plate Addict
The rule of this award is that once you have been tagged you have to reveal seven things about yourself and pass the award to seven others. So, pass on the award and spread the fun.... ;-) ;-) .

Feb 24, 2011

The Potter's Wheel

     Pottery is one of the most ancient arts that has come a long way since history.  Even today the potter's wheel is used to make the  the traditional gamlas (flower pot)  and ghadas (the oval shaped pot) .It's amazing to see how a potter's hands work on his wheel  and the patience of the potter in masterfully shaping the desired piece out of clay.

     In a process called "throwing" , a ball of clay is placed in the center of a turntable, called the wheel-head, which the potter rotates with a stick, with foot power or with a variable-speed electric motor. During the process of throwing, the wheel rotates rapidly while the solid ball of soft clay is pressed, squeezed and pulled gently upwards and outwards into a hollow shape. The first step of pressing the rough ball of clay downward and inward into perfect rotational symmetry is called centering the clay--a most important skill to master before the next steps: opening (making a centered hollow into the solid ball of clay), flooring (making the flat or rounded bottom inside the pot), throwing or pulling (drawing up and shaping the walls to an even thickness), and trimming or turning (removing excess clay to refine the shape or to create a foot). (Excerpt : wikipedia)


 All pictures taken at the Dune .

    Feb 17, 2011

    The Dune Eco Beach Resort - the Green Paradise ....!!

    Ever imagined a stay which is bestowed with best of nature with achingly breathtaking views of sea and lush greenery or a night under the stars and moonlight ? The Dune - Eco Village and Spa, a sprawling 35 acre property of landscaped gardens and organic farm offers all the above and a definite breath of fresh air for anyone bogged down by the woes of a big city.        
     
         
     The pathway in front of the 'FUN' restaurant ....!!
    The picturesque setting  of  the FUN restaurant ...!!!

     Children's play area at the Dune...!!

     Chandelier made from colorful soda bottles...!!
     How I would luv to curl up here with a good book to read ..!!

     We spend a weekend at the Dune and I would call it  - "total bliss in the lap of nature " ... !!! Whether it be the lip-smacking 'Watallapan' we had at the restaurant or the activities offered at the resort ... or the endless bike rides.... or the smiling friendly staff offering to help out with anything ..or the cute resort pets 'Nash' and 'Pongo' .with their non-stop wagging tails..... It was quite an enjoyable,memorable and divine experience... !!!         

    The Seafood bar dining area amidst coconut trees 
    besides a pool... !!!
    I love the stone table top and the multi-colored place mats ...!!
     Outdoor seating in the lawn...I love the color of the bedding - 
                          such a lovely contrast against the grass...!!              
                          
    Located in Pondicherry,The Dune's pristine beach lets one soak up the old-world glamour in tranquil surrounds, while its contemporary design provides a stimulus for an exciting unpredictable experience. Difficult to choose the best, each room is unique in design, architecture and concept - whether it be the exquisitely carved ceilings of the ancient Kerala house or the artist's studio room with private pool or the  kaleidoscope of colors created by the traditional glass bangles adorning the Bangle house or the magnificient view of the Tower House perched at a height of 50 feet offering an always exciting view of the sea. Each unit houses a piece of the past, inspired by the life and customs of people hailing from the Southern part of India and antiques and curios from former South Indian palaces and colonial bungalows are used as a part of the construction. Solar hot water systems, solar lighting equipments, waste water plants have been installed to keep the reduce impact on environment. 


    Back at the hotel, the guests can participate in various activities like boating, tennis, volley ball, cow milking, balloon shooting, organic farming or pottery making... 

    Last, in spite of the numerous snaps taken at the dune...
    I had to post these pictures of 'Pongo' and 'Nash'
    the lovely pets of the Dune who gave us company.. 
    and made our stay even more memorable.. !!!

    All in all, I think that the dune is a green paradise of sorts... !!
    Note : It was after reading this lovely post at Saffron and Silk, I was tempted to visit the Dune. Thanks a lot for sharing, Kamini.                       
            
    I am linking this post to Skywatch and the Weekend Wrap Up party here.

    Feb 11, 2011

    Love is in the air....

    Illustration by Tanya Newbery, Image via 

    Have a perfect & relaxed Valentine's week !!

    Feb 6, 2011

    Handpainted favors from Tuscan Style Artisans

          Tuscan Style Artisan Crafts is a etsy shop that specialises in handmade tuscan style accents - the creative outlet of two sister-in-laws - Laurie and Susan who came with the idea while they were drinking a delectable bottle of an Antinori supertuscan and planning Laurie's wedding which was actually taking place in Tuscany. Laurie was interested in arts and crafts since sophomore year in high school and that was way back in 1984. Over the years she started making gifts,favors and even invitations for her friends and family members which were always well received and proudly displayed.

         It all started in 2005 when the owner of wine boutique asked her to make a few pieces for the local craft fair.Working in a hectic environment and leading a busy life herself didn't leave much time for her to make anything in the required quantity. That was when her creative sister in law, Susan, offered to help and that year they made a ton of items and went to the craft fair to debut Tuscan Style Artisans. The first venture went on very well and as they say, the rest is history!

         Other than following her creative instincts, Laurie is also an avid birdwatcher and loves hummingbirds the most. Every year she tracks their migration online and has her feeders ready for their arrival. Shes adds that "There is something amazing about a tiny creature that has the strength and determination to travel so far! They're such an inspiration".

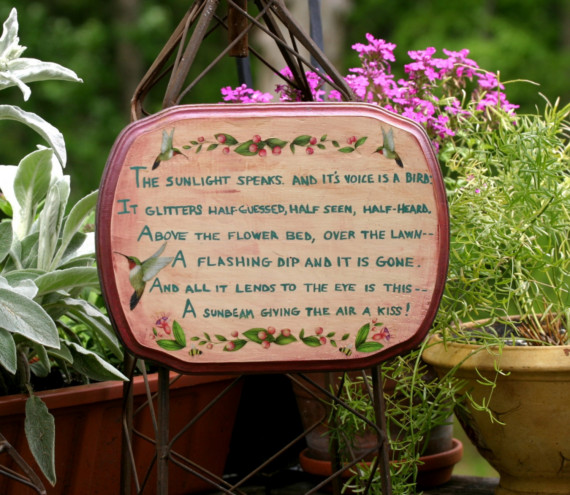
    Hand painted and hand lettered with quaint phrases and
    gorgeous sunflower decoupage embellishments !!!


    The handmade crafts from Tuscan Style Artisans seek to capture the essence of Tuscan Style through the use of a warm color palette and embellishments evocative of wineries, vineyards, nature, sunflowers, breathtaking vistas and the enchanting agriturismi found throughout the region.

    Wow! I love this .... so charming.. and so.. sweet..
    And I totally love these birdhouses... *Cute*** aren't they ..?


    Birdhouse with gorgeous Tuscan sunflower decoupage
    embellishments ...!!

    If you have ever visited Tuscany, these charming items will awaken your wonderful memories. And, if you dream of visiting Tuscany, any item from the TuscanStyle Artisans collection will bring you one step closer!!!!

    Feb 3, 2011

    DIY : Heart Shaped Flower Arrangement

         What's there in a Valentine's Day without something heart shaped & red roses.. ...? So lets see how to make a simple heart-shaped flower arrangement...for this Valentine's Day... !! 


    Materials Needed :

    Floral Foam (Brick shaped or Heart shaped) -1
    Knife
    Roses or any flower ( 15 approx)
    toothpick -1

    Draw the Heart shape on the floral foam using a pencil
    or toothpick.
       Note : Omit the inner heart in the picture. That was the trial image.
    Cut the floral foam into two halves.
    Have a waste paper underneath to secure
     the scraps falling off from the foam.
     Cut the floral foam lengthwise also into two halves, so 
    that the heart shape can be carved out easily.
     Keep the knife vertically and cut out the heart shape.
    Shorten the stems of the roses. Select roses of almost same 
    size for the arrangement.
     Start arranging the roses along the edge.
    If needed, you can also punch holes in the floral foam with a
    toothpick to arrange the roses.
    Arrange the roses until the entire foam is covered.
    Note : Soak the floral foam in water for 10 minutes if you
    want the flowers to stay fresh for a long time.

    After arranging and then re-arranging the roses for the third time.. I achieved the near-to-heart shaped arrangement that is seen here.. ;-) ;-) ...

     I am linking this post to the February Carnival at the Key Bunch, Show off your Stuff party, you create party and the Valentine's day Party here  and here.